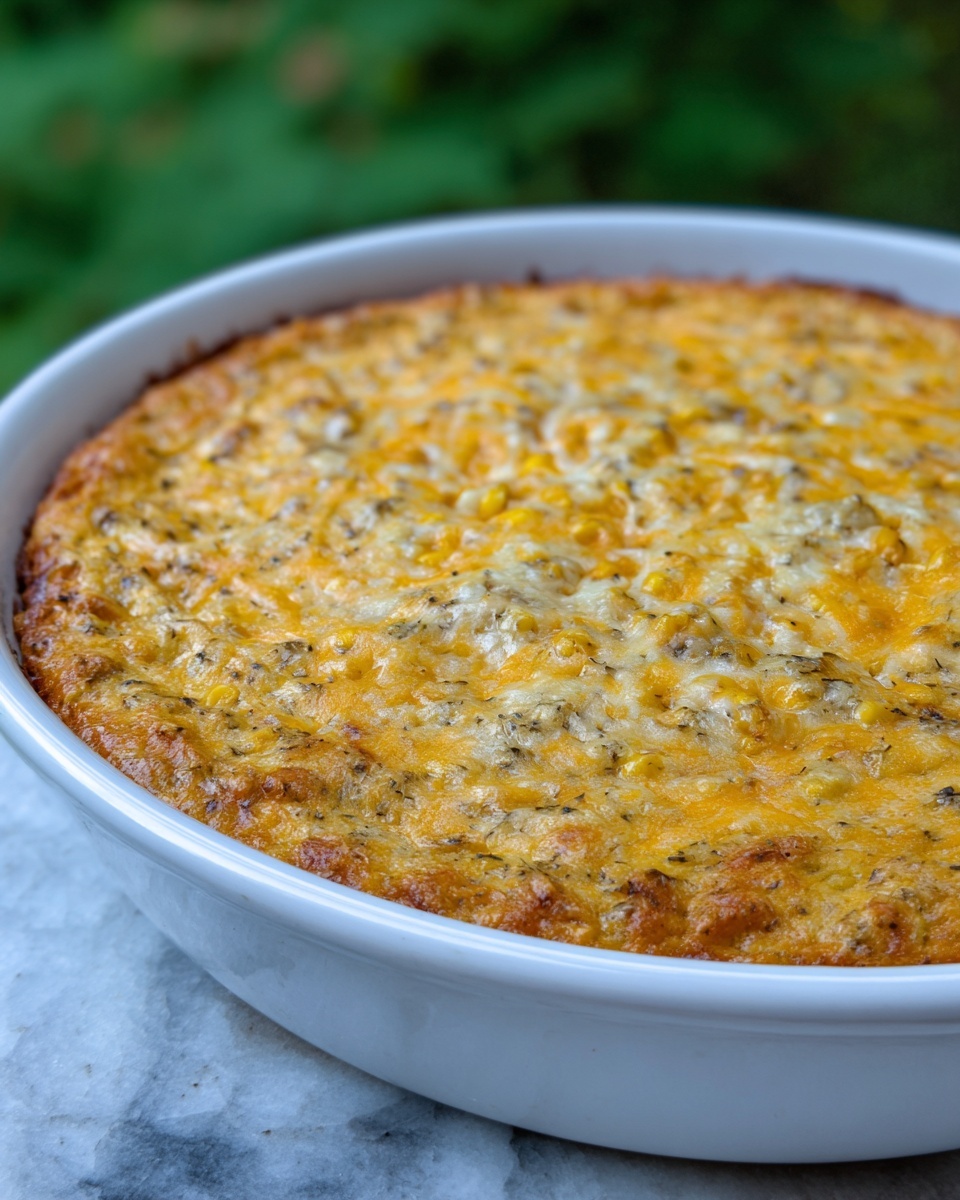
If you’re searching for a comforting, crowd-pleasing side dish that feels like a warm hug on a plate, this Corn Pudding Casserole Recipe is exactly what you need. Creamy, slightly sweet, and perfectly tender, this casserole brings out the best in simple ingredients, transforming everyday corn into a luscious, golden delight. Whether you’re making it for a holiday feast, a family dinner, or just because, this dish always gets rave reviews and keeps everyone asking for seconds.
Ingredients You’ll Need
This recipe calls for ingredients that are humble but absolutely essential to achieving that rich taste and creamy texture everyone adores. Each component plays a key role, from the crunch of whole kernel corn to the silky smoothness of creamed corn and sour cream. Here’s what you’ll need to whip up your very own Corn Pudding Casserole Recipe:
- Whole kernel corn (2 cans, 15 oz each): Drained to add delightful texture and bursts of natural sweetness.
- Creamed corn (1 can, 15 oz): Provides a creamy base that binds the dish perfectly.
- Unsalted butter (1/2 cup, melted): Adds richness and helps create that golden crust.
- Sour cream (1 cup): Boosts tanginess and moisture for a tender bite.
- Beaten eggs (2 large): Work as a binder to set the pudding just right.
- Granulated sugar (1/2 cup): Enhances the natural sweetness without overpowering.
- All-purpose flour (1/4 cup): Gives structure to ensure the casserole holds together.
- Salt (1/2 tsp): Balances flavors beautifully.
- Black pepper (1/4 tsp): Adds a subtle hint of spice.
- Baking powder (1/2 tsp): Helps the pudding rise and fluff up just enough.
- Shredded cheddar cheese (1 cup, optional): For an extra creamy, cheesy burst if you want to elevate the dish further.
How to Make Corn Pudding Casserole Recipe
Step 1: Prepare the Oven & Baking Dish
Start by preheating your oven to 350 degrees Fahrenheit (175 degrees Celsius). Make sure to grease a 9-by-9-inch or 2-quart casserole dish thoroughly with butter or cooking spray; this step ensures your luscious casserole won’t stick and will come out looking gorgeous.
Step 2: Combine Wet Ingredients
Grab a large mixing bowl and whisk together your melted butter, sour cream, and beaten eggs until you have a smooth, velvety mixture. This combination is the creamy heart of our Corn Pudding Casserole Recipe and will wrap every spoonful in comforting richness.
Step 3: Add Dry Ingredients
Now, add the sugar, flour, salt, pepper, and baking powder to the wet mixture. Stir everything gently until smooth and well incorporated. This ensures your casserole will have the perfect balance of sweet and savory flavors along with structure.
Step 4: Add the Corn
Fold in the drained whole kernel corn and creamed corn until evenly mixed. The variety in corn texture creates that signature contrast between creamy and slightly chunky that makes this corn pudding so irresistible.
Step 5: Optional Cheese Addition
If you’re a cheese lover or just want to add an extra layer of richness, fold in the shredded cheddar cheese at this point. It melts beautifully into the casserole, giving it a gooey, flavorful boost that’s hard to resist.
Step 6: Assemble the Casserole
Pour your corn mixture into the prepared baking dish, smoothing the top so it bakes evenly. This sets the stage for a golden-brown crust that’s both beautiful and delicious.
Step 7: Bake
Slide the casserole into your preheated oven and bake for 45 to 50 minutes. You’re looking for a gorgeous golden top and a casserole that’s firm to the touch but still wonderfully moist inside.
Step 8: Serve & Enjoy
Allow your corn pudding to cool for a few minutes before serving. This resting time helps it set perfectly and makes every bite melt in your mouth. It pairs wonderfully with roasted meats, turkey, ham, or can stand on its own as a delicious side highlight.
How to Serve Corn Pudding Casserole Recipe

Garnishes
Feel free to sprinkle some fresh herbs like chopped parsley, chives, or green onions over the top before serving to add a pop of color and a touch of fresh brightness. A little extra shredded cheese melted on top can also be a lovely finishing touch for those who didn’t include it in the bake.
Side Dishes
This casserole shines alongside roasted turkey or ham during festive meals, but it also pairs beautifully with grilled chicken or pork chops. Add a crisp green salad or roasted vegetables, and you’ve got a meal that feels both special and homey.
Creative Ways to Present
For a fun twist, scoop portions of the corn pudding into individual ramekins for personal servings. You can also top it with crispy bacon bits or a dollop of sour cream for added flair. Holiday dinners or potlucks become extra memorable when you present this dish with love and a creative touch.
Make Ahead and Storage
Storing Leftovers
Once cooled, cover your leftover corn pudding casserole with plastic wrap or transfer it to an airtight container and store it in the refrigerator. It will keep well for up to 3 to 4 days, making it a great dish to enjoy the next day or add to your meal prep rotation.
Freezing
This Corn Pudding Casserole Recipe also freezes beautifully. After baking and cooling thoroughly, wrap it tightly with foil and store it in the freezer for up to 2 months. When you’re ready to enjoy, thaw overnight in the fridge before reheating.
Reheating
To reheat, place your casserole in an oven-safe dish (if it’s not already), and warm it in a preheated 350 degrees Fahrenheit oven for about 20-25 minutes, or until heated through and just starting to brown on top. You can also microwave single portions on medium power; just keep an eye on it to avoid drying out.
FAQs
Can I make this Corn Pudding Casserole Recipe dairy-free?
Absolutely! Substitute the butter with a dairy-free margarine or oil, use a dairy-free sour cream alternative, and omit the cheese or replace it with a dairy-free cheese. The texture will still be creamy and delicious.
Is this recipe suitable for gluten-free diets?
To make this recipe gluten-free, simply swap the all-purpose flour with a gluten-free flour blend or cornstarch. This change will keep your casserole just as tender and flavorful without any gluten concerns.
Can I add other vegetables to this casserole?
Definitely! Diced bell peppers, jalapeños, or finely chopped onions can add extra flavor and a bit of crunch. Just be mindful not to add too much liquid, so your pudding stays creamy and not watery.
What’s the best way to ensure my Corn Pudding Casserole is not runny?
Drain the whole kernel corn well and measure ingredients carefully. Also, don’t underbake the casserole—make sure the edges are set and the top is golden brown before removing it from the oven.
Can I prepare this casserole in advance and bake it later?
Yes! You can mix all the ingredients, cover the dish tightly, and refrigerate it overnight. When ready, just pop it in the oven and bake as instructed, adding a few extra minutes if it’s cold from the fridge.
Final Thoughts
This Corn Pudding Casserole Recipe is one of those wonderful dishes that brings comfort and joy with every bite. It’s straightforward to make, wonderfully versatile, and loved by young and old alike. Whether for weeknight dinners or holiday celebrations, don’t hesitate to try this recipe—it might just become your new favorite that everyone at the table looks forward to.
Print
Corn Pudding Casserole Recipe
- Prep Time: 15 minutes
- Cook Time: 45-50 minutes
- Total Time: 1 hour
- Yield: 6 servings
- Category: Side Dish
- Method: Baking
- Cuisine: American
Description
This creamy and comforting Corn Pudding Casserole combines whole kernel corn, creamed corn, and a rich blend of butter, sour cream, and eggs. Baked to golden perfection, this dish makes a perfect side for holiday meals or any family dinner, offering a sweet and savory flavor with a smooth, custard-like texture.
Ingredients
Main Ingredients
- 2 cans (15 oz each) whole kernel corn, drained
- 1 can (15 oz) creamed corn
- 1/2 cup unsalted butter, melted
- 1 cup sour cream
- 2 large eggs, beaten
- 1/2 cup granulated sugar
- 1/4 cup all-purpose flour
- 1/2 tsp salt
- 1/4 tsp black pepper
- 1/2 tsp baking powder
- 1 cup shredded cheddar cheese (optional, for extra richness)
Instructions
- Prepare the Oven & Baking Dish: Preheat your oven to 350°F (175°C). Grease a 9×9-inch or 2-quart casserole dish with butter or cooking spray to prevent sticking.
- Combine Wet Ingredients: In a large mixing bowl, whisk together the melted butter, sour cream, and beaten eggs until the mixture is smooth and uniform.
- Add Dry Ingredients: Incorporate the sugar, flour, salt, black pepper, and baking powder into the wet ingredients. Stir thoroughly until the batter is smooth and well combined.
- Add the Corn: Fold in the drained whole kernel corn and creamed corn, ensuring that the corn is evenly distributed throughout the batter.
- Optional Cheese Addition: If you prefer a richer casserole, gently fold in the shredded cheddar cheese for added creaminess and flavor.
- Assemble the Casserole: Pour the prepared corn batter into the greased baking dish, spreading it evenly for uniform cooking.
- Bake: Place the casserole in the preheated oven and bake for 45 to 50 minutes. The top should turn golden brown and the pudding should be set and firm to the touch.
- Serve & Enjoy: Allow the casserole to rest and cool for a few minutes before serving. This dish is best enjoyed warm and pairs beautifully with roasted meats, turkey, or ham.
Notes
- You can use fresh corn if available; about 3 cups of fresh kernels can replace the canned corn.
- For a gluten-free version, substitute the all-purpose flour with gluten-free flour blend.
- Adding shredded cheddar cheese is optional but adds richness and depth of flavor.
- Letting the casserole cool slightly before serving helps it to firm up and makes serving easier.
- Store leftovers in an airtight container in the refrigerator for up to 3 days and reheat gently before serving.

