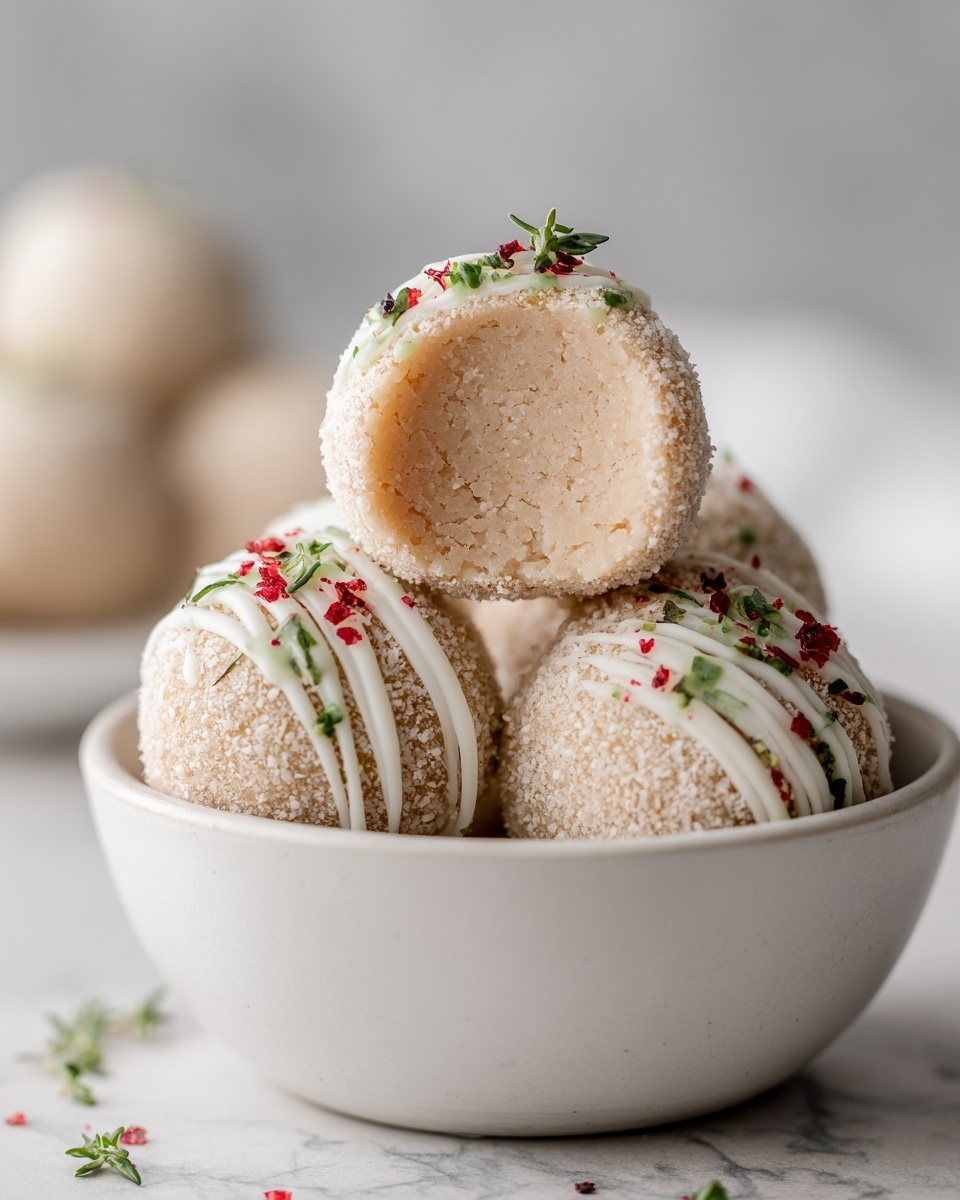
If you are searching for a fun, festive treat that perfectly blends rich creaminess with a touch of sweetness, the Peanut Butter Snowballs Recipe is exactly what you need. These delightful little bites bring together smooth peanut butter, buttery graham crackers, and luscious white chocolate in one irresistible package. Whether it’s for a holiday gathering or just a cozy night in, they dazzle with their melt-in-your-mouth texture and charming snowball appearance that everyone will love.
Ingredients You’ll Need
The beauty of this Peanut Butter Snowballs Recipe is how it uses simple pantry staples that work harmoniously to create a luxurious flavor and perfect texture. Each ingredient plays a vital role—from the creamy peanut butter providing richness, to the powdered sugar adding just the right sweetness, and the white chocolate giving that glossy, dreamy finish.
- Creamy peanut butter: The star ingredient, offering smoothness and depth of flavor to your snowballs.
- Butter, softened: Adds a velvety richness and helps bind the filling together.
- Vanilla extract: Brightens and enhances the overall taste with a warm, sweet aroma.
- Powdered sugar: Sweetens and gives the texture a delicate, powdery softness.
- Graham cracker crumbs: Adds subtle crunch and a lovely toasty flavor for balance.
- White chocolate bark or chips: Creates a smooth, sweet coating that hardens perfectly around each snowball.
- Holiday sprinkles (optional): Adds festive color and fun visual appeal to finish.
How to Make Peanut Butter Snowballs Recipe
Step 1: Blend the Peanut Butter Filling
Begin by combining the creamy peanut butter, softened butter, and fragrant vanilla extract in a large mixing bowl. You can use a stand mixer for ease, but a sturdy spoon works just fine too. Mix until the ingredients are smoothly blended, creating a luscious base that’s full of flavor and silky texture.
Step 2: Incorporate the Dry Ingredients
Next, stir in the powdered sugar and graham cracker crumbs. These add just the right amount of sweetness and texture, transforming the mixture into a dough-like consistency that’s neither too sticky nor too dry. This step is crucial to achieving that perfect melt-in-your-mouth quality.
Step 3: Shape the Snowballs
Line a baking sheet with parchment paper to make clean-up easy and prevent sticking. Scoop out about a tablespoon of the mixture and roll it gently between your palms into a smooth, round ball. Repeat until you have a beautiful batch ready to chill in the fridge.
Step 4: Chill the Balls
Place the peanut butter balls on the prepared sheet and refrigerate for 30 minutes. This chilling time helps firm them up so they’ll hold their shape during the chocolate coating process.
Step 5: Melt the White Chocolate
While the balls chill, melt the white chocolate bark or chips in a microwave-safe bowl. Heat in 30-second intervals, stirring between each, until completely melted and silky smooth. This step requires a gentle touch to avoid burning and ensures a glossy finish on your snowballs.
Step 6: Dip Each Ball in Chocolate
Using a fork or toothpick, dip each chilled peanut butter ball into the melted white chocolate. Tap the utensil on the bowl’s edge to remove any excess coating; this keeps the final presentation neat and elegant. Lay the coated snowballs back on the parchment-lined sheet.
Step 7: Decorate and Set
If you want to add extra flair, spoon any leftover melted chocolate into a small plastic baggie or piping bag, snip a tiny corner off, and drizzle it artistically over the coated snowballs. Top with festive holiday sprinkles if you’re feeling cheerful. Finally, refrigerate for at least 15 minutes to allow the chocolate to harden flawlessly.
How to Serve Peanut Butter Snowballs Recipe
Garnishes
These snowballs look charming when dusted lightly with a sprinkle of powdered sugar to mimic fresh snow. You can also add extra holiday sprinkles or crushed peanuts for texture and color contrast, making each bite as pretty as it is delicious.
Side Dishes
Peanut Butter Snowballs Recipe pairs beautifully with a warm cup of coffee, a rich hot chocolate, or even a glass of cold milk. They also make a fun, sweet addition alongside fruit platters or light salads for dessert in holiday spreads.
Creative Ways to Present
Arrange your snowballs in decorative gift boxes tied with ribbon for edible presents. Alternatively, display them on a wooden board or tiered cake stand for a festive centerpiece at holiday parties. You could even serve them in mini cupcake liners to keep things tidy and adorable.
Make Ahead and Storage
Storing Leftovers
Once prepared, these snowballs keep wonderfully in an airtight container in the refrigerator for up to one week. Just make sure they’re chilled to maintain their texture and prevent the chocolate from melting.
Freezing
Want to make a batch ahead of time for later? Freeze the peanut butter snowballs on a baking sheet first, then transfer them to a freezer-safe container. They’ll stay fresh for up to three months and thaw quickly in the fridge when you’re ready to enjoy.
Reheating
Because these treats are best enjoyed cool, reheating is unnecessary. Simply allow frozen snowballs to thaw in the refrigerator for a few hours before serving. This keeps the chocolate coating intact and the filling perfectly creamy.
FAQs
Can I use crunchy peanut butter instead of creamy?
Yes! While creamy peanut butter gives the smoothest texture, using crunchy can add a lovely little crunch inside the snowballs. Just be aware the texture will be a bit more varied.
Is there a substitute for graham cracker crumbs?
You can try finely crushed digestive biscuits or vanilla wafers as alternatives. They provide a similar flavor and texture, though graham cracker crumbs remain the classic choice.
Can I use dark or milk chocolate instead of white?
Absolutely. Dark or milk chocolate can be used, but white chocolate gives the best “snowball” look. If you switch chocolates, just be sure to adjust the sweetness level accordingly.
Are peanut butter snowballs gluten-free?
They can be, as long as you use gluten-free graham cracker crumbs or substitute with gluten-free cookies. Always check labels to be sure.
What is the best way to prevent the white chocolate from seizing?
Heat the chocolate slowly in short bursts, stirring frequently. Using a microwave-safe bowl and avoiding any water contact helps keep your chocolate smooth and shiny.
Final Thoughts
There is something truly magical about sharing the Peanut Butter Snowballs Recipe with friends and family during any occasion. They’re easy to make, festive to look at, and absolutely delicious. I can’t wait for you to try this recipe and experience just how simple ingredients can come together to create such a memorable treat. Happy baking!
Print
Peanut Butter Snowballs Recipe
- Prep Time: 15 minutes
- Cook Time: 0 minutes
- Total Time: 45 minutes
- Yield: 24 servings
- Category: Dessert, Snack, Holiday Treat
- Method: No-Cook
- Cuisine: American
Description
Delightfully sweet and creamy Peanut Butter Snowballs coated in smooth white chocolate and decorated with festive sprinkles. These no-bake treats combine a rich peanut butter filling with crunchy graham cracker crumbs, perfect for holiday gatherings or anytime you crave a bite-sized indulgence.
Ingredients
Peanut Butter Filling
- 1 cup creamy peanut butter
- 2 tablespoons butter, softened
- 1 teaspoon vanilla extract
- 1 ½ cups powdered sugar
- 1 cup graham cracker crumbs
Coating
- 8 ounces white chocolate bark or white chocolate chips
- Holiday sprinkles (optional)
Instructions
- Prepare the filling: In a large mixing bowl, combine the peanut butter, softened butter, and vanilla extract until the mixture is smooth and well blended. Using a stand mixer can make this step easier.
- Mix dry ingredients: Add the powdered sugar and graham cracker crumbs to the peanut butter mixture. Stir thoroughly until all ingredients are fully incorporated and the mixture becomes thick enough to hold shape.
- Shape the balls: Line a baking sheet with parchment paper. Using a tablespoon measuring spoon, scoop out portions of the mixture and roll each into a smooth, round ball. Place the formed balls onto the prepared baking sheet.
- Chill the balls: Refrigerate the peanut butter balls for 30 minutes to firm up, which helps them hold their shape during dipping.
- Melt the white chocolate: Place white chocolate bark or chips in a microwave-safe bowl. Heat in 30-second increments, stirring between each, until the chocolate is completely melted and smooth.
- Dip the snowballs: Using a fork or toothpick, dip each chilled peanut butter ball into the melted white chocolate, coating it evenly. Tap the fork gently on the edge of the bowl to let excess chocolate drip off before placing it back on the parchment-lined sheet.
- Decorate: Pour any remaining melted chocolate into a piping bag or plastic baggie with a small cut corner. Drizzle decorative lines over the coated balls and add holiday sprinkles if desired.
- Set the coating: Place the decorated snowballs back in the refrigerator for at least 15 minutes to allow the white chocolate coating to fully set and harden.
Notes
- Ensure the peanut butter mixture is firm enough to roll; if too sticky, add a little more graham cracker crumbs.
- Use high-quality white chocolate for the best taste and smooth coating.
- Store the snowballs in an airtight container in the refrigerator for up to one week.
- For variation, try coating in milk or dark chocolate instead of white chocolate.
- Allow the chocolate to cool slightly before dipping to avoid melting the peanut butter centers.
