“`html
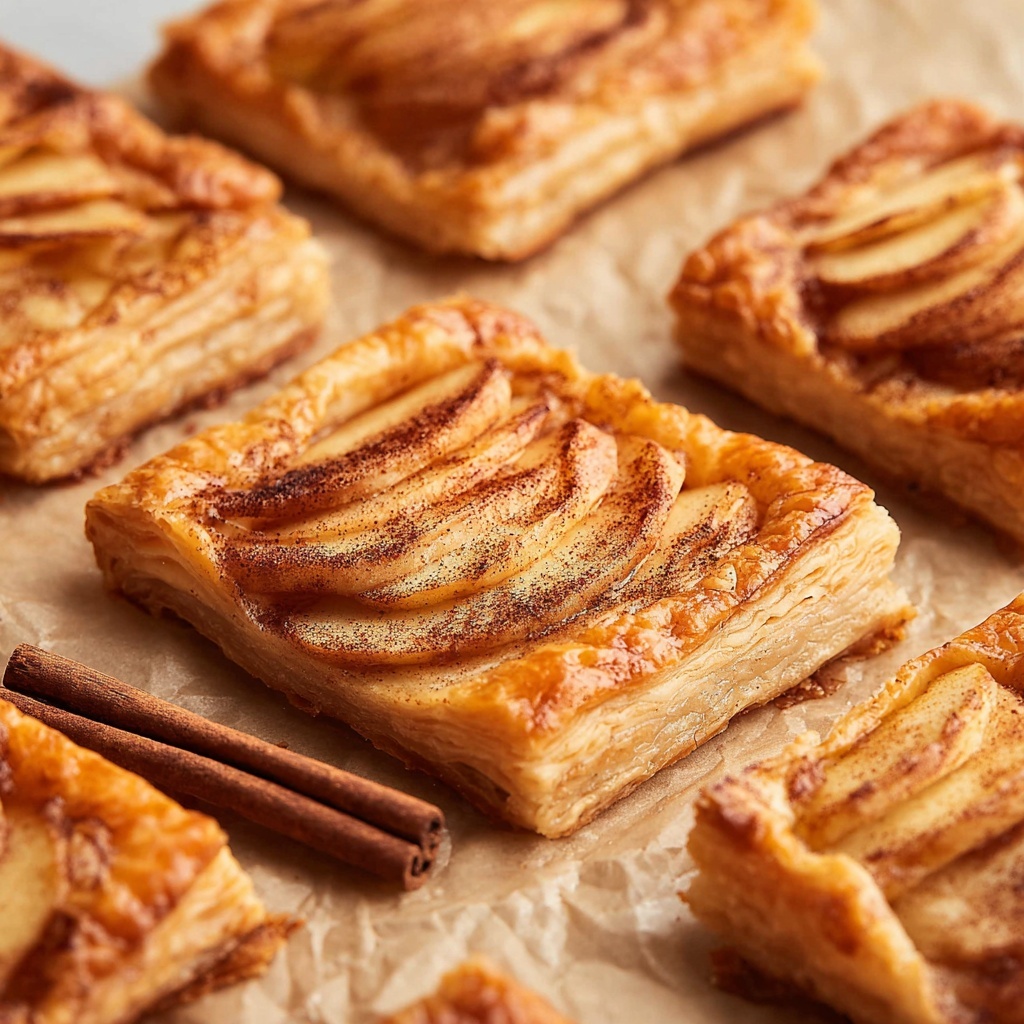
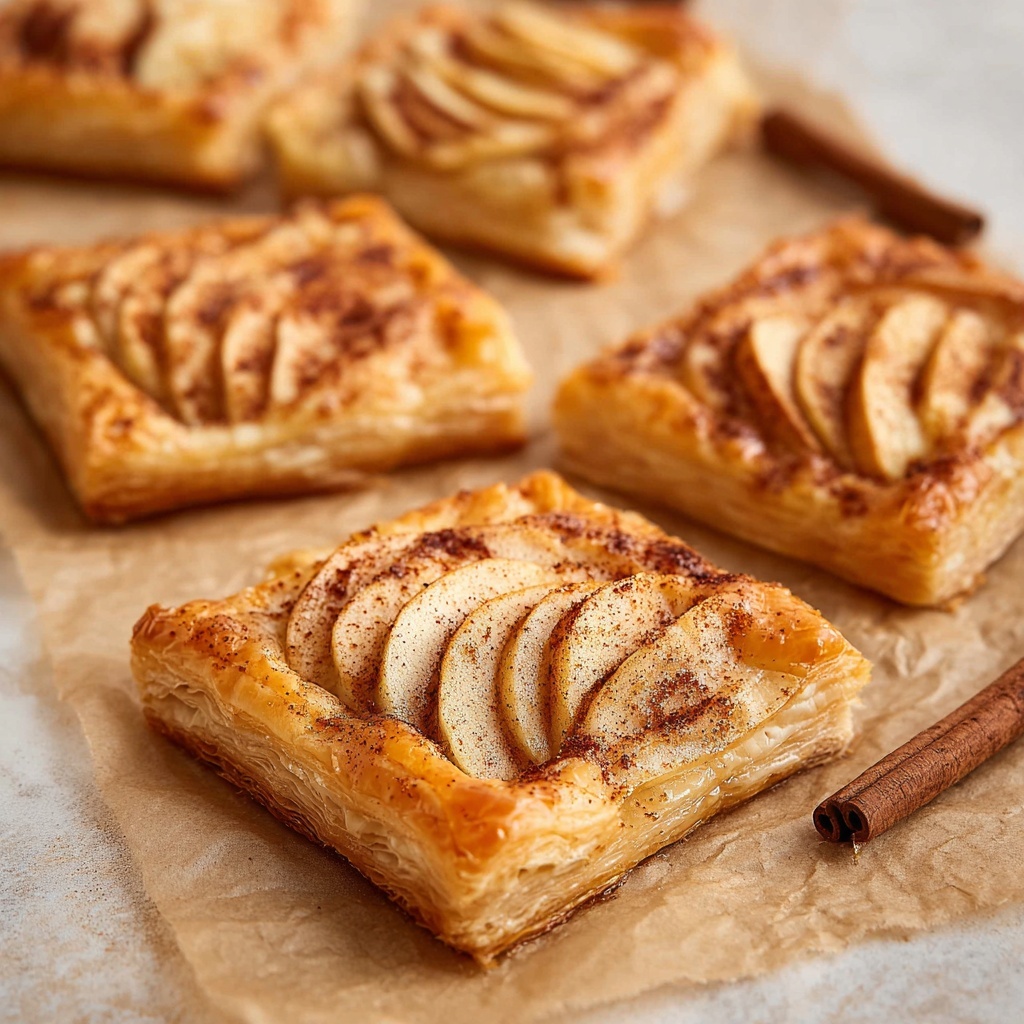
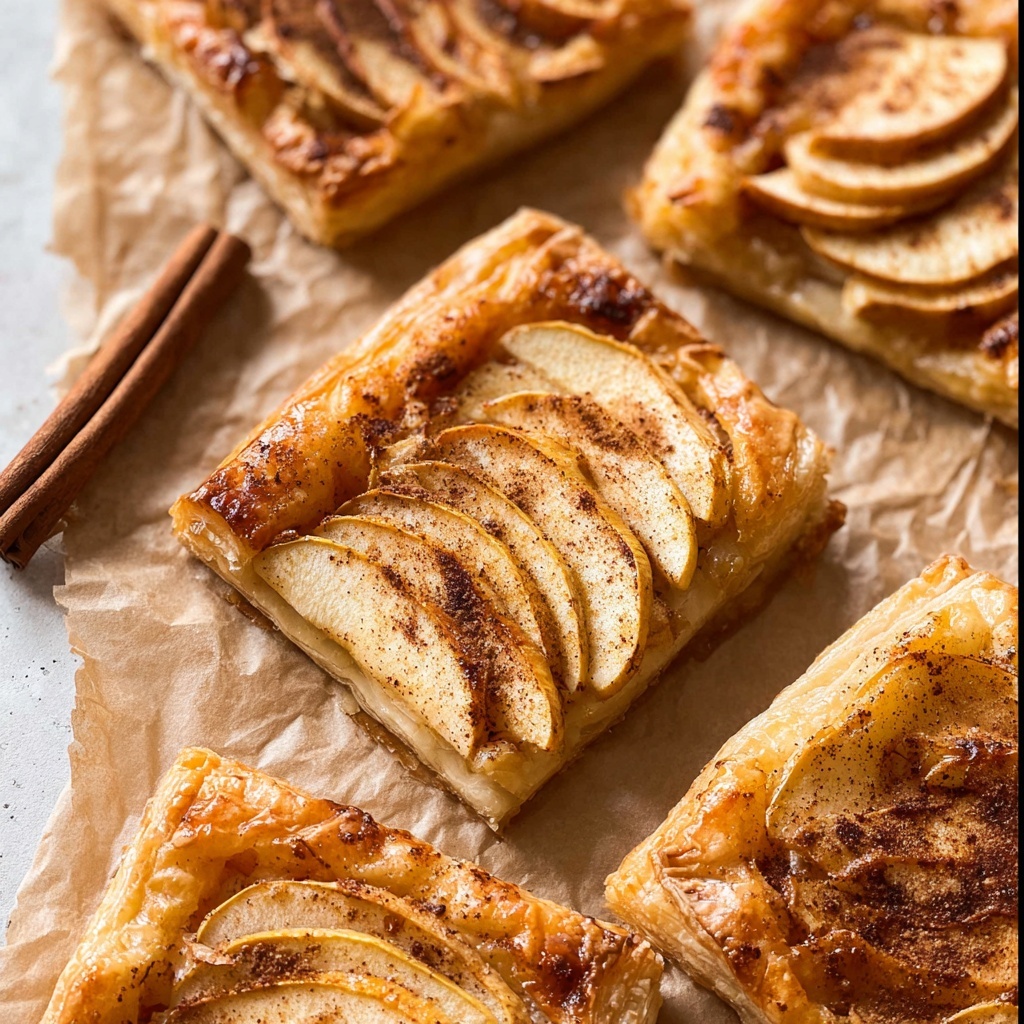
There is something incredibly charming and irresistibly delicious about this Puff Pastry Apple Tart Recipe. It takes simple, everyday ingredients like crisp apples and flaky puff pastry and transforms them into a golden, caramelized masterpiece that’s as delightful to look at as it is to eat. Whether you’re making it for a casual family gathering or a special dessert treat, this tart blends the warm flavors of cinnamon and nutmeg with the buttery crunch of puff pastry, creating a mouthwatering experience that feels both cozy and elegant.
Ingredients You’ll Need
This Puff Pastry Apple Tart Recipe calls for straightforward ingredients that are easy to find but pack a punch when combined. Each item plays a crucial role in building layers of flavor, texture, and aroma that make the tart truly unforgettable.
- 3 small/medium apples: Peeled and thinly sliced, these provide the fruit base that’s juicy and tender after baking.
- 1 puff pastry sheet: This flaky, buttery dough creates a light and crispy foundation to hold the apples.
- ¼ cup brown sugar: Adds just the right amount of sweetness and a beautiful caramel note when baked.
- ½ teaspoon vanilla: Brings warmth and subtle complexity to the apple filling.
- ¼ teaspoon nutmeg: Enhances the tart with a hint of cozy spice without overpowering.
- 1 ½ teaspoons cinnamon: Infuses the apples with the classic spice flavor that pairs perfectly with their natural tartness.
- Pinch of sea salt: Balances the sweetness and elevates all the flavors.
- 3 tablespoons melted butter: Divided to both enrich the apples and brush the pastry edges for golden crispiness.
- 2 tablespoons honey (optional): Used after baking to give a shiny glaze and a touch of floral sweetness.
How to Make Puff Pastry Apple Tart Recipe
Step 1: Preheat and Prepare the Apples
Start by preheating your oven to 400°F to ensure a hot environment for perfect puffing of the dough. Meanwhile, peel your apples and slice them as thinly as you can — this guarantees even cooking and a tender bite. Toss these slices gently in a bowl with two tablespoons of melted butter, brown sugar, cinnamon, nutmeg, vanilla, and a pinch of sea salt. This mixture lets the apple slices soak up all those delicious flavors before baking.
Step 2: Prep the Puff Pastry and Arrange
Line a baking sheet with parchment paper, then lay your thawed puff pastry sheet right on top. Using a sharp knife, lightly score a rectangle border one inch inside the edges—the key is not to cut all the way through, this tactic helps the edges puff up elegantly while keeping the apple juices contained within that frame. Prick the center with a fork to prevent excessive rising in the middle and brush the border with the remaining melted butter. Finally, arrange your apple slices neatly inside the border. Whether in rows or a creative pattern, the apples are the star of the show here.
Step 3: Bake to Perfection
Pop the tart into the oven for about 20 minutes, but don’t wander far—check at 15 minutes and then every couple of minutes. You’ll want the edges to puff up beautifully into a golden-brown crust and the apples to soften and caramelize just right. It’s that wonderful moment when buttery pastry meets tender fruit, and your kitchen fills with irresistible aroma.
Step 4: Finishing Touches
Once out of the oven, give your tart a quick brush with honey (warmed slightly in the microwave to make it easy to spread). This adds a shimmering glaze and an extra hint of sweetness that makes every bite even more special. Let the tart cool for several minutes so the juices set a bit before slicing and serving.
How to Serve Puff Pastry Apple Tart Recipe
Garnishes
A simple dusting of powdered sugar or a sprinkle of chopped toasted almonds can elevate the tart’s appearance and texture. A dollop of whipped cream or a scoop of vanilla ice cream adds a creamy contrast that pairs spectacularly with the warm, spiced apples.
Side Dishes
This tart shines beautifully as a dessert but can also be an impressive baked treat for brunch. Pair it with a cup of strong coffee or a mellow herbal tea to balance the sweet, buttery notes. For a heartier meal, serve alongside sharp cheddar cheese slices—a surprisingly delicious combo that balances sweet and savory.
Creative Ways to Present
Try cutting the tart into charming bite-sized squares for a party platter, or serve warm with a drizzle of caramel sauce and a sprinkle of flaky sea salt to turn up the indulgence. You can even build mini tarts using ramekins or tart tins following the same method for personalized portions that feel extra special.
Make Ahead and Storage
Storing Leftovers
If you have leftovers, cover the tart tightly with plastic wrap or store in an airtight container in the refrigerator. It will keep well for 2 to 3 days, and the flavors often deepen after resting.
Freezing
This Puff Pastry Apple Tart Recipe freezes nicely before baking. Wrap the prepared tart in plastic wrap and then foil, and freeze for up to one month. When ready, thaw overnight in the fridge and bake as directed for freshly baked results anytime.
Reheating
To bring back that crisp, flaky texture, reheat leftover tart in a 350°F oven for about 10 minutes rather than microwaving. This keeps the puff pastry from getting soggy and revives its golden glow.
FAQs
Can I use frozen puff pastry for this apple tart?
Absolutely! Just be sure to fully thaw the puff pastry sheet in the fridge before using, so it rolls out and bakes up perfectly crisp and flaky.
What types of apples work best in this recipe?
Crisp, tart apples like Granny Smith or Honeycrisp give the best balance of texture and flavor in the Puff Pastry Apple Tart Recipe, as they hold up well during baking without turning mushy.
Is it necessary to peel the apples?
Peeling is recommended for a smooth texture and to keep the tart looking elegant, but if you prefer a bit more rustic feel and extra fiber, leaving the skin on can work too.
How can I make the tart more visually impressive?
Try arranging the apple slices in overlapping concentric circles or a fan pattern. Brushing with warmed honey afterward adds a stunning glossy finish.
Can this tart be made dairy-free?
Yes! Simply substitute the butter with a plant-based alternative or coconut oil, and use a dairy-free puff pastry to keep it vegan and dairy-free while still delicious.
Final Thoughts
This Puff Pastry Apple Tart Recipe is one of those effortless yet show-stopping desserts that everyone will love. It brilliantly combines simple ingredients into a warm, comforting dish that looks elegant and tastes like a dream. Whether you’re an experienced baker or trying this for the first time, I promise you’ll be adding this tart to your forever recipe list. So go ahead, give it a try and watch how quickly it becomes a crowd favorite in your kitchen!
“`
Print
Puff Pastry Apple Tart Recipe
- Prep Time: 10 minutes
- Cook Time: 20 minutes
- Total Time: 30 minutes
- Yield: 9 servings
- Category: Dessert
- Method: Baking
- Cuisine: American
- Diet: Vegetarian
Description
This delightful Puff Pastry Apple Tart combines thinly sliced apples tossed in warm spices with a flaky, golden puff pastry base. Sweetened with brown sugar and enhanced with vanilla and a hint of nutmeg, it’s brushed with butter and optionally drizzled with honey for extra sweetness. Perfect as a quick, impressive dessert or elegant snack, this tart is easy to assemble and bakes to golden perfection in just 30 minutes.
Ingredients
Apple Filling
- 3 small/medium apples, peeled and sliced thin
- ¼ cup brown sugar
- ½ teaspoon vanilla extract
- ¼ teaspoon nutmeg
- 1½ teaspoons cinnamon
- Pinch of sea salt
- 2 tablespoons melted butter (for tossing apples)
Puff Pastry
- 1 sheet puff pastry, thawed
- 1 tablespoon melted butter (for brushing border)
- 2 tablespoons honey (optional, for brushing)
Instructions
- Preheat Oven: Preheat your oven to 400°F (200°C) to get it ready for baking the tart.
- Prepare Apple Mixture: Peel and thinly slice the apples. In a bowl, toss the slices with 2 tablespoons of melted butter, brown sugar, cinnamon, nutmeg, vanilla extract, and a pinch of sea salt until they are evenly coated.
- Prepare Puff Pastry: Line a baking sheet with parchment paper. Lay the thawed puff pastry on the sheet and score a 1-inch border around the edges using a sharp knife—do not cut all the way through, just enough to create a border that will puff up during baking.
- Dock Pastry Center: Using a fork, poke holes in the center section inside the scored border to prevent the center from puffing too much during baking. Brush the border with the remaining tablespoon of melted butter.
- Arrange Apples: Evenly arrange the apple slices over the center area of the puff pastry within the scored border. You can arrange them in neat rows or any pattern you like for a pretty presentation.
- Bake: Place the tart in the preheated oven and bake for about 20 minutes, or until the puff pastry edges are golden brown and puffed. Start checking at 15 minutes and then monitor closely every 2 minutes to avoid over-baking.
- Add Honey (Optional) and Serve: Remove the tart from the oven and, while still warm, gently brush the apple slices with honey (microwave the honey for about 15 seconds to thin it if desired). Let the tart cool for a few minutes before serving to allow it to set.
Notes
- Use firm apples like Granny Smith, Honeycrisp, or Fuji for the best texture.
- If you don’t have vanilla extract, you can omit it or replace with a pinch of vanilla powder.
- The honey glaze adds a lovely shine and extra sweetness but is optional.
- Ensure the puff pastry is fully thawed for easy handling and best puff.
- Serve the tart slightly warm or at room temperature, optionally with whipped cream or vanilla ice cream.

