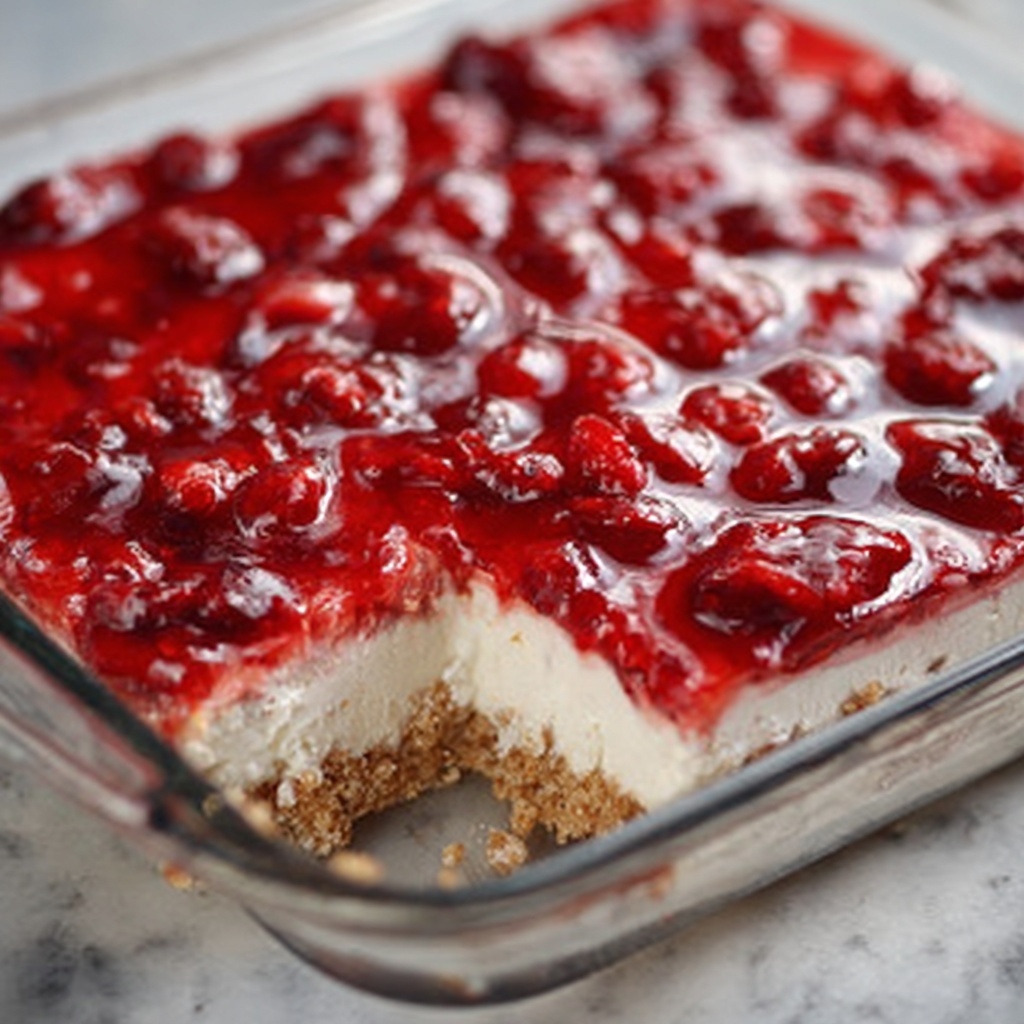
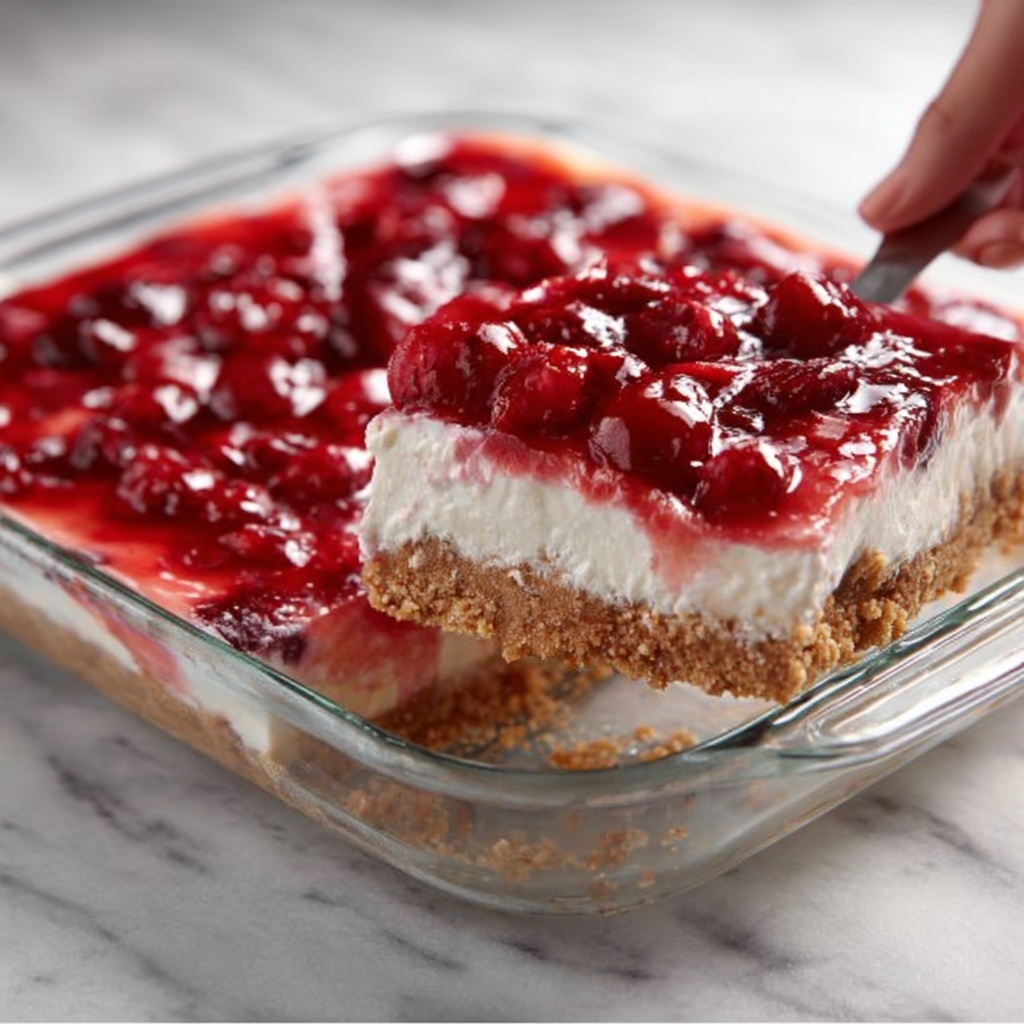
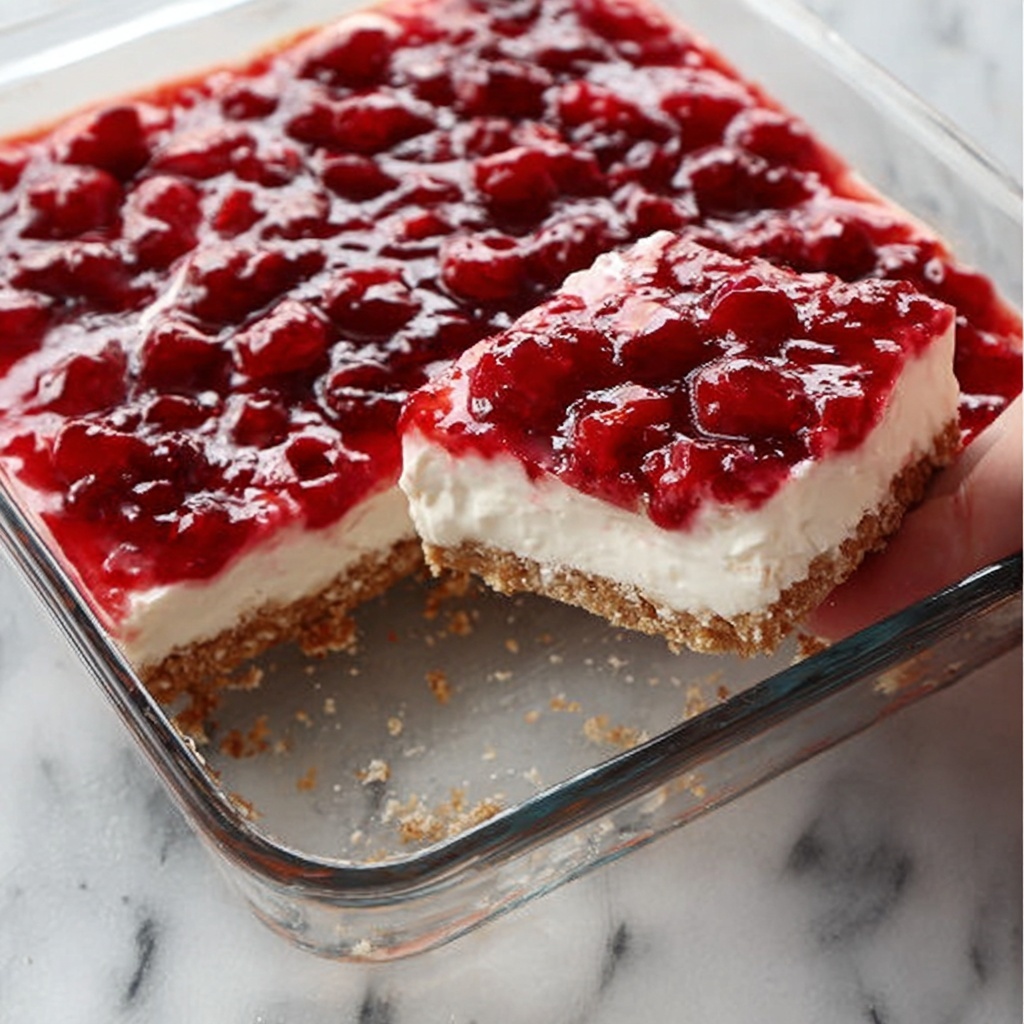
If you’re craving a dessert that feels indulgent yet comes together without turning on the oven, then you are going to fall absolutely in love with the Easiest No-Bake Cherry Cheesecake Recipe. This delightful cheesecake blends a buttery, crunchy graham cracker crust with a luxuriously creamy filling, topped with a bright, juicy cherry pie layer that adds just the right pop of color and flavor. It’s a dream come true for anyone who loves a rich, fruity dessert but wants to keep things simple in the kitchen. Once you try this recipe, it will quickly become your go-to for celebrations, weeknight treats, or anytime that cheesecake craving strikes.
Ingredients You’ll Need
The beauty of this cheesecake lies in its simplicity, with just a handful of ingredients that each play a vital role in creating the perfect balance of taste, texture, and color. From the crumbly crust to the creamy filling and the luscious cherry topping, every component is essential.
- 1 1/2 cups graham cracker crumbs: Provides a sweet, crunchy base with a classic flavor that perfectly complements the creamy filling.
- 1/3 cup granulated sugar: Sweetens the crust to contrast the tangy cream cheese and cherries.
- 1/2 cup unsalted butter (melted): Binds the crust ingredients while adding richness and a buttery aroma.
- 16 oz cream cheese (softened): The star of the filling, offering smooth creaminess and a slight tang.
- 1 cup powdered sugar: Adds sweetness to the filling without grit and helps maintain silky texture.
- 1 teaspoon vanilla extract: Brings warmth and depth of flavor to the filling.
- 1 cup heavy whipping cream (cold): Whipped to fluffy perfection, it lightens up the filling for a dreamy mouthfeel.
- 1 (21 oz) can cherry pie filling: Tops the cheesecake with a bright, glossy finish and bursts of fruitiness that elevate every bite.
How to Make Easiest No-Bake Cherry Cheesecake Recipe
Step 1: Prepare the Crust
Start by combining the graham cracker crumbs, granulated sugar, and melted butter in a medium bowl. Stir until the crumbs are evenly coated and resemble damp sand. Press this mixture firmly into the bottom of a 9-inch springform pan or pie dish, creating an even, compact layer. This crust is the foundation for your cheesecake’s crisp texture, so don’t be shy about pressing firmly. Once shaped, pop it into the refrigerator to chill while you prepare the filling.
Step 2: Whip Up the Cream Cheese Filling
In a large mixing bowl, beat the softened cream cheese until it’s completely smooth and free of lumps. Then, add the powdered sugar and vanilla extract, continuing to beat until the mixture becomes creamy and well incorporated. This step ensures the filling is sweet with a hint of warmth from the vanilla, creating that signature cheesecake flavor everyone loves.
Step 3: Fold in Whipped Cream for Lightness
In a separate chilled bowl, whip the heavy cream until stiff peaks form—this means when you lift the whisk out, the peaks hold their shape firmly. Gently fold the whipped cream into the cream cheese mixture using a spatula, being careful not to deflate it. This folding step airy up the filling, turning it into a luscious, cloud-like layer that is irresistible.
Step 4: Assemble the Cheesecake
Spread the fluffy cream cheese filling evenly over your prepared crust. Use a spatula to smooth the top so every slice looks picture-perfect. Cover your cheesecake with plastic wrap or a lid, then refrigerate it for at least 4 hours, or even better, overnight. This chilling step lets the flavors meld and ensures the cheesecake sets up firmly without needing any baking.
Step 5: Add the Cherry Topping and Serve
Right before serving, spoon the cherry pie filling over the top of the cheesecake. The glistening cherries add a gorgeous finish and a burst of sweet-tart flavor that complements the creamy base beautifully. Slice, serve, and enjoy your effortless masterpiece!
How to Serve Easiest No-Bake Cherry Cheesecake Recipe
Garnishes
While the cherry topping is already stunning, adding a few fresh garnishes can elevate your presentation and flavor. Try sprinkling some toasted almond slivers for crunch or a few fresh mint leaves for a pop of green and refreshing aroma. A light dusting of powdered sugar around the edges can also create a delicate, elegant look perfect for special occasions.
Side Dishes
This cheesecake pairs beautifully with a hot cup of coffee, a fruity herbal tea, or even a glass of sparkling wine to cut through the richness with a bit of fizz. If you’re serving it as part of a dessert spread, fresh berries, lemon sorbet, or even a small bowl of whipped cream on the side will complement it wonderfully without stealing the show.
Creative Ways to Present
For a fun twist, slice the cheesecake into small squares and serve them in mini glass jars or parfait cups layered with extra cherries and whipped cream. You can also use individual tart pans to make personal-sized portions, perfect for parties. No matter how you present it, this recipe’s classic look and vibrant red topping will always catch everyone’s eye.
Make Ahead and Storage
Storing Leftovers
Wrap any leftover cheesecake tightly with plastic wrap or store it in an airtight container. Keep it refrigerated and enjoy within 3 to 4 days for the best taste and texture. The crust will stay crisp, and the filling will remain smooth and creamy without drying out.
Freezing
If you want to save some for later, this no-bake cheesecake freezes excellently. Freeze it uncovered for a couple of hours first to set the topping, then wrap it in plastic wrap and aluminum foil to protect against freezer burn. It can last up to 2 months in the freezer. Thaw it overnight in the fridge to restore its creamy, sliceable texture.
Reheating
This cheesecake is best served cold, so avoid reheating. After thawing, just let it rest for a few minutes at room temperature if you prefer a slightly softer texture, then slice and indulge!
FAQs
Can I use a store-bought graham cracker crust?
Absolutely! Using a pre-made graham cracker crust can save you even more time and still produce great results. Just make sure it fits a 9-inch pan and adjust the chilling time accordingly.
What if I’m allergic to dairy?
This recipe relies heavily on dairy ingredients, so it wouldn’t be suitable for those with dairy allergies. However, there are dairy-free cream cheese and whipped cream alternatives available that might work, though the texture and flavor might differ slightly.
Can I substitute the cherry pie filling with other flavors?
Definitely! Feel free to swap cherry pie filling for blueberry, strawberry, or lemon curd for a different twist on this classic cheesecake. Each topping brings its own unique flair while keeping the recipe just as simple.
How long does the cheesecake need to chill?
At a minimum, chilling for 4 hours will help the cheesecake set, but refrigerating overnight leads to the creamiest texture and richest flavor, making slicing easier and the taste more intense.
Is this recipe suitable for beginners?
Yes, this is one of the easiest cheesecake recipes around, perfect for beginners or anyone short on time but wanting to impress. The no-bake method simplifies the process without sacrificing flavor or texture.
Final Thoughts
If you’re looking for a foolproof, delicious dessert that requires minimal effort but delivers maximum deliciousness, the Easiest No-Bake Cherry Cheesecake Recipe is your answer. It’s creamy, refreshing, and beautifully simple, promising smiles and satisfied taste buds with every slice. I can’t wait for you to give it a try and make it a favorite in your dessert rotation!
Print
Easiest No-Bake Cherry Cheesecake Recipe
- Prep Time: 15 minutes
- Cook Time: 0 minutes
- Total Time: 4 hours 15 minutes
- Yield: 8 servings
- Category: Dessert
- Method: No-Cook
- Cuisine: American
- Diet: Vegetarian
Description
This Easiest No-Bake Cherry Cheesecake is a creamy, luscious dessert featuring a buttery graham cracker crust and a smooth cream cheese filling topped with sweet cherry pie filling. Perfect for a quick yet impressive treat, it’s simple to prepare without any baking required.
Ingredients
Crust
- 1 1/2 cups graham cracker crumbs
- 1/3 cup granulated sugar
- 1/2 cup unsalted butter, melted
Filling
- 16 oz cream cheese, softened
- 1 cup powdered sugar
- 1 teaspoon vanilla extract
- 1 cup heavy whipping cream, cold
Topping
- 1 (21 oz) can cherry pie filling
Instructions
- Prepare the crust: In a medium bowl, mix the graham cracker crumbs, granulated sugar, and melted butter until well combined. Press the mixture firmly into the bottom of a 9-inch springform pan or pie dish to form the crust. Chill in the refrigerator while preparing the filling.
- Make the cream cheese filling: In a large bowl, beat the softened cream cheese until smooth. Add powdered sugar and vanilla extract, and beat until fully incorporated.
- Whip the heavy cream: In a separate bowl, whip the cold heavy cream until stiff peaks form.
- Combine filling and whipped cream: Gently fold the whipped cream into the cream cheese mixture until smooth and fluffy.
- Assemble the cheesecake: Spread the filling evenly over the prepared crust and smooth the top. Cover and refrigerate for at least 4 hours, or overnight for the best results.
- Add the topping and serve: Before serving, top the cheesecake with cherry pie filling. Slice and enjoy!
Notes
- You can use a store-bought graham cracker crust for an even faster version.
- Swap cherry topping with blueberry, strawberry, or lemon curd for variety.


