If you have been searching for the ultimate creamy, dreamy frozen treat that is both allergy-friendly and indulgent, then this Vegan Chocolate Ice Cream – No Coconut & Nut-Free Recipe is your new best friend. Bursting with rich chocolate flavor but cleverly crafted without coconut or any nuts, this ice cream is perfect for those with dietary restrictions or anyone craving a luscious vegan dessert without compromises. With a silky texture from soy and oat milk plus the magic of homemade sweetened condensed soy milk, every spoonful feels like a celebration of kindness to both your taste buds and your body.
Ingredients You’ll Need
Simple ingredients come together effortlessly in this recipe, each playing a vital role to build flavor, texture, and that irresistibly smooth consistency we all adore in ice cream. Nothing complicated here—just wholesome staples delivering maximum delight.
- Unsweetened soy milk (4.25 cups): Provides a creamy base without overpowering sweetness, perfect for a smooth, dairy-free ice cream.
- Caster sugar (1 cup): Also known as superfine sugar, it dissolves easily to sweeten the ice cream evenly.
- Sea salt (¼ teaspoon): Enhances the chocolate flavor and balances the sweetness beautifully.
- Soy cream (14.1 oz): Adds luscious fat content that mimics dairy cream for the perfect velvety mouthfeel.
- Oat milk (⅓ cup): Lightens the mixture slightly and lends a subtle natural sweetness, you can substitute with any plant-based milk you prefer.
- Vanilla extract (1 teaspoon): Deepens flavor complexity and rounds out the chocolate notes.
- Dutch processed cocoa powder (6 tablespoons): The hero ingredient—rich, smooth, and less acidic for intense chocolate goodness.
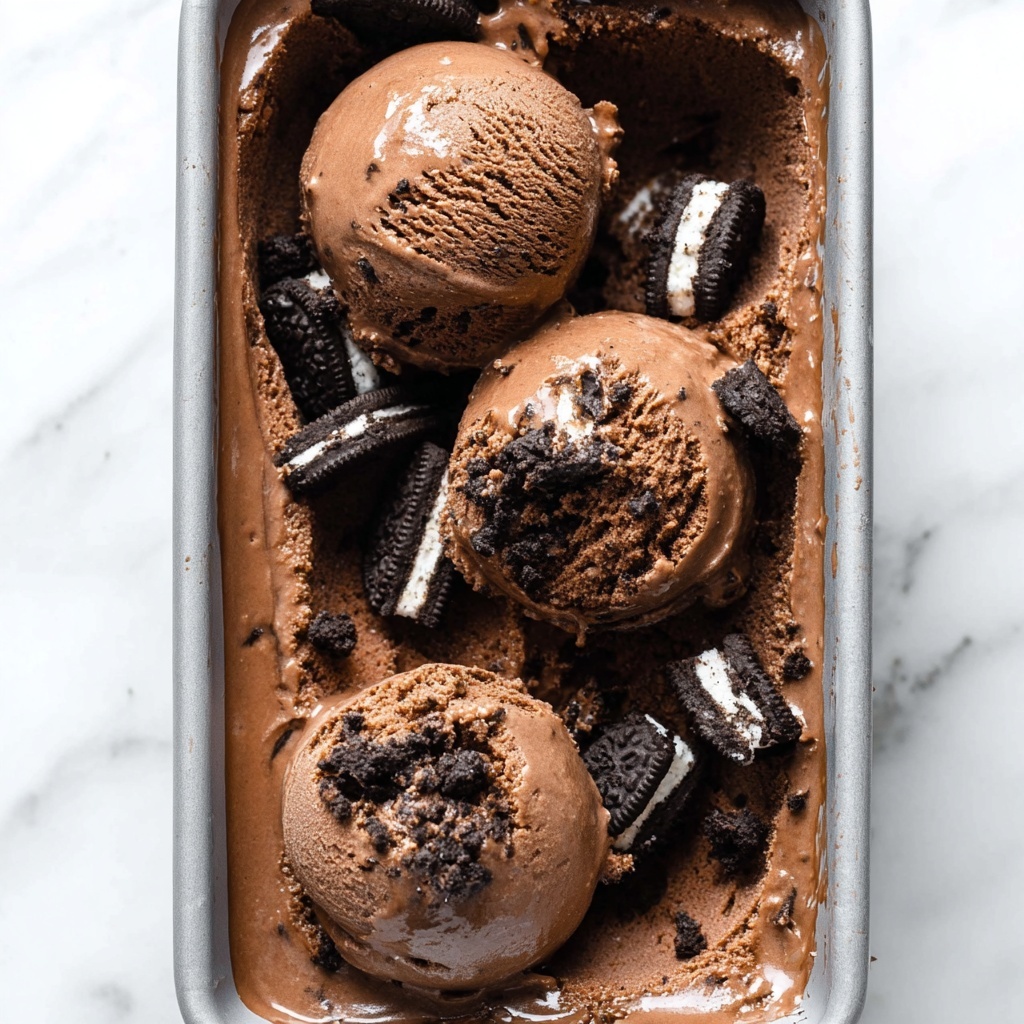
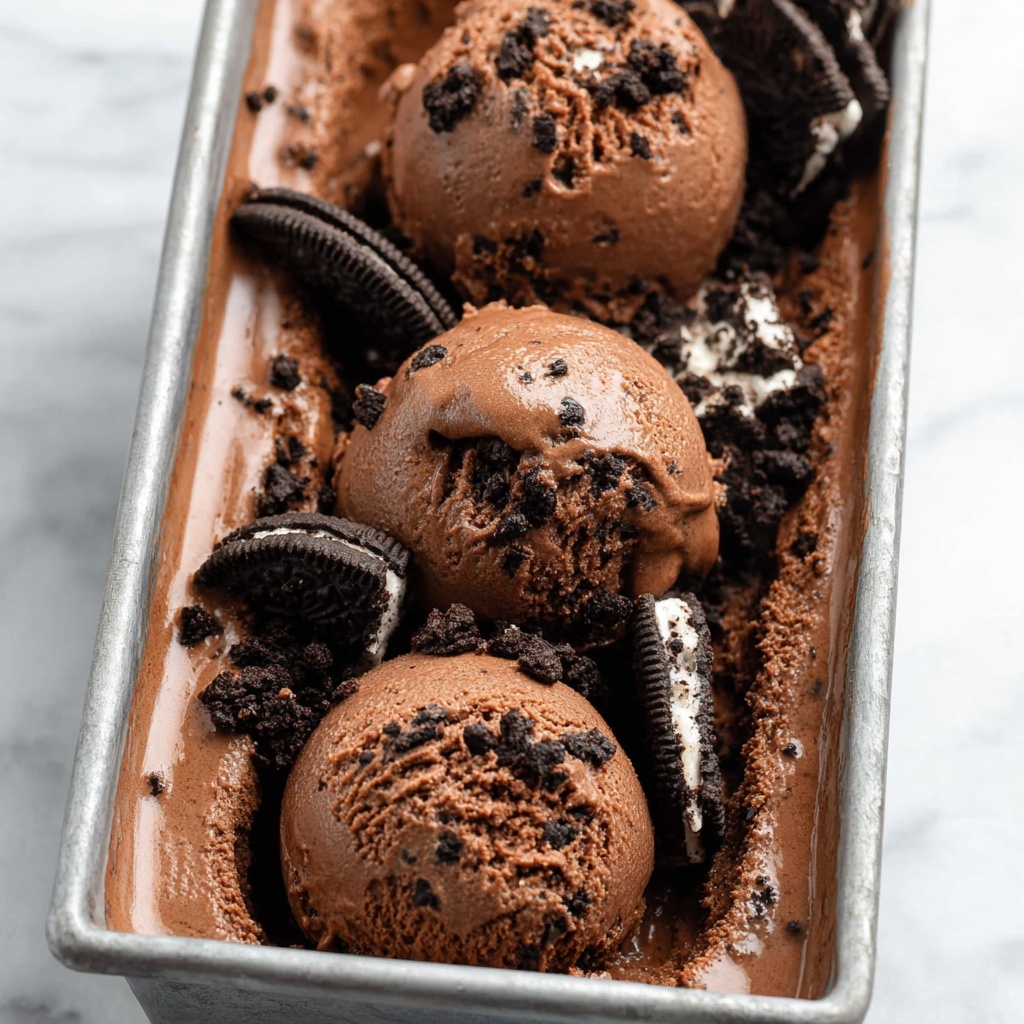
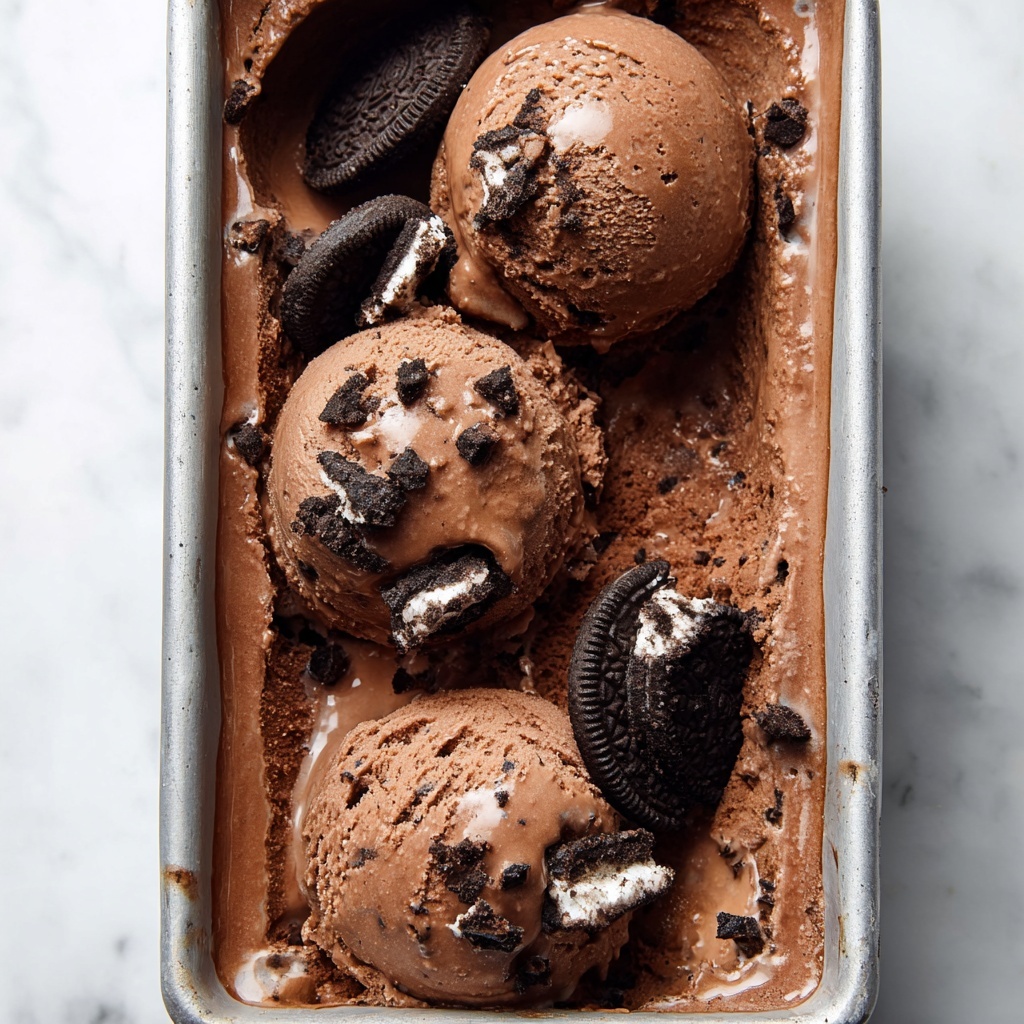
- Vegan Oreos or other vegan cookies (8-10): Optional but highly recommended, for adding a delightful crunch and cookie swirl throughout.
How to Make Vegan Chocolate Ice Cream – No Coconut & Nut-Free Recipe
Step 1: Make Sweetened Condensed Soy Milk
This is the secret to luscious creaminess without dairy or nuts. Start by pouring the soy milk, caster sugar, and sea salt into a large saucepan. Choose a pot with plenty of room for bubbling over because this mixture will simmer and thicken dramatically. Heat on medium while stirring just enough to dissolve the sugar. When it begins to simmer, reduce heat to a gentle simmer. This slow cooking process is key—it allows the flavors to concentrate and the liquid to reduce into a sticky, condensed milk-like consistency over 2 hours. Be patient and whisk every 15 minutes to keep it smooth and prevent burning. By the end, your mixture should resemble thickened sweetened condensed milk, about 350 grams in volume.
Step 2: Combine Ingredients for the Ice Cream Base
Once your sweetened condensed soy milk has cooled completely, transfer it to a mixing bowl. While whisking gently, pour in the cold soy cream to build that rich, creamy texture you crave in ice cream. Next, slowly whisk in the oat milk and vanilla extract until everything is perfectly smooth and homogenous.
Step 3: Incorporate the Cocoa Powder
Add the Dutch processed cocoa powder in small increments to ensure a smooth chocolate blend. Whisk for about ten seconds after each tablespoon to avoid lumps and encourage a beautiful, rich chocolate color and flavor throughout the mixture. This step transforms the base into a deeply chocolaty canvas for your ice cream masterpiece.
Step 4: Churn Your Ice Cream
Pour the mixture into your ice cream maker and let it churn according to your machine’s instructions—mine takes about 40 minutes. This process aerates the ice cream and freezes it to the perfect scoopable texture. If you want to include a cookie crunch, gently fold in the crushed vegan Oreos once churning is complete, mixing evenly for that exciting surprise in every bite.
Step 5: Freeze Until Firm
Transfer the churned ice cream into a loaf pan lined with parchment paper to prevent sticking. Cover tightly and place it in the freezer for at least 2 hours. This final freeze solidifies the ice cream so you can slice or scoop it with ease.
Step 6: Serve and Enjoy
Before digging in, remove the ice cream from the freezer about 5 to 10 minutes early. This brief thawed moment softens it just enough to scoop effortlessly while maintaining that sublime creamy texture you worked so hard to create.
How to Serve Vegan Chocolate Ice Cream – No Coconut & Nut-Free Recipe
Garnishes
Elevate your vegan chocolate ice cream by topping it with fresh raspberries or sliced strawberries, adding a bright, tart contrast that pairs beautifully with the rich chocolate. Sprinkle a dusting of cocoa powder or vegan chocolate shavings for a refined touch. Crushed cookie crumbs or vegan chocolate chips can add an extra layer of texture and flavor fun.
Side Dishes
This ice cream is a stellar dessert all on its own, but serving it alongside warm vegan brownies or a slice of moist vegan banana bread transforms your treat into a decadent dinner party finale. Fresh fruit pies or vegan cakes play perfectly complementing roles, making every bite a luscious mix of warm and cold sensations.
Creative Ways to Present
Pour some vegan hot fudge or homemade berry sauce over a scoop for a fancy sundae experience. Layer scoops with cookie crumbles and vegan whipped cream in a parfait glass for a stunning presentation. Or serve alongside vegan waffles or pancakes as a dreamy brunch dessert that will wow friends and family alike.
Make Ahead and Storage
Storing Leftovers
Any leftover vegan chocolate ice cream should be tightly stored in an airtight container to prevent freezer burn. Press a layer of parchment paper or plastic wrap directly onto the surface of the ice cream before sealing to maintain that creamy texture and protect from icy crystals forming.
Freezing
You can safely freeze the ice cream for up to 2 weeks without compromising quality. Longer storage may cause it to become overly hard or develop ice crystals, so enjoying it within this timeframe ensures the best taste and texture.
Reheating
Since this is ice cream, reheating is not recommended. However, allowing it to sit at room temperature for a few minutes before scooping will soften it nicely without melting. Simply avoid microwaving, which can ruin the texture.
FAQs
Can I substitute soy milk with another plant milk in this recipe?
Absolutely! While soy milk provides the perfect creaminess and protein balance here, you can use oat milk, pea milk, or other plant-based milks. Just keep in mind the flavor and texture might shift slightly.
Why is there no coconut or nuts in this recipe?
This recipe is designed specifically to accommodate those with allergies or sensitivities to coconut and nuts, creating a safe and delicious chocolate ice cream alternative for anyone avoiding these common allergens.
Do I need an ice cream maker to make this recipe?
While an ice cream maker produces the best creamy texture, if you don’t have one, you can freeze the mixture in a shallow container and stir every 30 minutes for 2-3 hours to reduce ice crystal formation and mimic churning.
Can I add other mix-ins besides Oreos?
Yes! Feel free to add vegan chocolate chips, dried fruit, or crushed vegan candy bars. Just fold them in after churning to keep them from breaking down too much.
Is this recipe suitable for children?
Definitely! It’s a fantastic dairy-free, nut-free treat that kids can safely enjoy. Just check any added mix-ins for additional allergens.
Final Thoughts
This Vegan Chocolate Ice Cream – No Coconut & Nut-Free Recipe is truly a game changer for anyone seeking a rich, allergy-friendly, and downright delicious vegan dessert. I cannot recommend it enough for family gatherings, hot summer afternoons, or whenever you need a soothing chocolate fix. Trust me, once you try this at home, it will become your go-to frozen treat that everyone, regardless of dietary needs, will ask you to make again and again!
Print
Vegan Chocolate Ice Cream – No Coconut & Nut-Free Recipe
- Prep Time: 15 minutes
- Cook Time: 2 hours 15 minutes
- Total Time: 4 hours 30 minutes
- Yield: 8 servings
- Category: Dessert
- Method: Stovetop
- Cuisine: Vegan, Dairy-Free
- Diet: Vegan
Description
This Vegan Chocolate Ice Cream recipe is rich, creamy, and completely dairy-free, made without coconut or nuts, making it perfect for those with allergies. Using sweetened condensed soy milk as a base, combined with soy cream, oat milk, and Dutch-processed cocoa powder, this decadent dessert is churned in an ice cream machine and finished with vegan cookies for a delightful crunch. It’s a luscious treat that’s simple to make and perfect for any occasion.
Ingredients
Sweetened Condensed Soy Milk
- 4.25 cups unsweetened soy milk
- 1 cup caster sugar (superfine sugar, or cane sugar)
- ¼ teaspoon sea salt
Ice Cream Base
- 14.1 oz soy cream
- ⅓ cup oat milk (or other plant-based milk of choice)
- 1 teaspoon vanilla extract
- 6 tablespoons Dutch processed cocoa powder
Mix-ins
- 8–10 vegan Oreos (or other vegan cookies of choice)
Instructions
- Make Sweetened Condensed Soy Milk: In a large saucepan, combine unsweetened soy milk, caster sugar, and sea salt. Heat on medium, stirring for a few minutes until the sugar dissolves completely.
- Simmer the Mixture: Increase heat until the mixture simmers; then reduce to medium to maintain a gentle simmer (avoid boiling). Watch carefully to prevent boiling over for the first 10 minutes.
- Cook and Stir Regularly: For 2 hours, whisk the mixture every 15 minutes, allowing it to reduce and thicken steadily.
- Monitor Final Reduction: In the last 15 minutes, pay close attention as the mixture becomes sticky and thick like regular condensed milk. Measure the volume by pouring into a heat-proof jug or bowl—there should be close to 350 grams. If the amount is higher, return to heat and reduce further for 10-15 minutes.
- Combine Ice Cream Ingredients: Let the sweetened condensed soy milk cool completely, then transfer it to a large bowl. Slowly whisk in the soy cream to blend fully.
- Add Remaining Liquids: Add oat milk and vanilla extract; whisk until smooth and well combined.
- Incorporate Cocoa Powder: Add Dutch processed cocoa powder one tablespoon at a time, whisking about 10 seconds between each addition until fully incorporated.
- Churn the Ice Cream: Pour the mixture into your ice cream machine and churn according to manufacturer’s instructions (approximately 40 minutes). Once churning is complete, fold in crushed vegan Oreos if using.
- Freeze the Ice Cream: Transfer the churned ice cream to a parchment-lined loaf pan. Cover and freeze for a minimum of 2 hours to firm up.
- Serve: Remove the ice cream from the freezer 5-10 minutes before serving to soften slightly for the best texture and enjoy!
Notes
- For vegan cookies, any brand of vegan Oreos or similar can be used for texture and flavor contrast.
- Ensure to use Dutch processed cocoa powder for a smoother, less acidic chocolate flavor.
- Chilling the sweetened condensed soy milk before mixing helps achieve a better consistency in the ice cream base.
- If you do not have an ice cream machine, you can place the mixture in a shallow container and freeze, stirring vigorously every 30 minutes until firm.
- This recipe is free from coconut and nuts, making it allergy-friendly.


